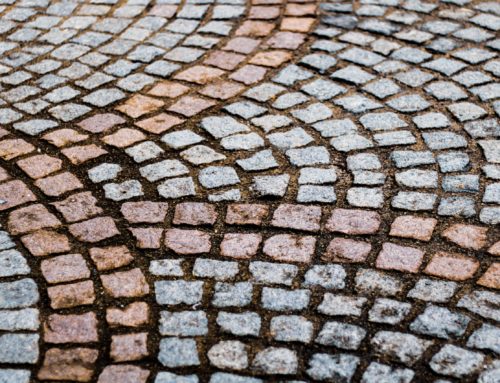

Are your patio pavers looking dingy and old? Are you thinking about replacing them? You should first know patio pavers are a significant investment. But there’s another solution instead of shelling out thousands of dollars. You can clean them! Check out our simple how-to guide to clean pavers.
How to Clean Pavers: An Overview
Patios make a massive difference in your home’s curb appeal. You want them to stay nice, so they don’t harm your home’s look. Even though pavers are very durable and reliable, they can still begin to get a little worn after all the fun barbecues and weather conditions take their toll. Overall, cleaning your pavers has more benefits than just making them look nice—regular cleanings make your pavers more durable and safer, too.
As a rule of thumb, if you maintain your pavers, cleaning is less time-consuming and less costly since you won’t have to restore or replace them all the time—so let’s get started.
Step #1: Choose a Cleaning Method
To begin, you should power wash your patio annually. You may need to purchase a basic cleaning solution for your pavers, or you can create homemade water and white vinegar solution to remove stubborn dirt and stains.
Be sure you test this solution on a small area before you clean the whole patio. This way, you know that the solution won’t discolor the entire surface.
Effective Cleaning Methods
Pressure Washing: Using a pressure washer to clean your pavers helps remove any tough stains and break down all buildups. Believe it or not, grass, leaves, dust, debris, and spills leave marks on your patio over time. But how do you know where to start?
First, you can rent or buy a power washer. Or, feel free to try a high-pressure setting on your hose nozzle instead. Once you’ve chosen your tool and an effective cleaning solution, like Simple Green, you may need to hit a couple of areas twice to make sure they’re spotless. The key to avoiding damages to your patio is to limit excess pressure when you don’t need it. Sure, you may need to use a higher setting to remove a stain or two, but you should probably take the pressure setting down a bit when cleaning the patio as a whole.
Next, make sure you keep the stream on the pavers and not hit the joints directly, which can cause your pavers to get dislodged. It’s normal for some of the sand in the joints to get displaced, so when you finish, brush it back after pressure washing. Lastly, after pressure washing, you should add a new layer of polymeric sand and activate the polymers to harden. You can do this by applying a light mist to the sand.
Dish Soap: You can use everyday dish soap to clean your pavers. Add some soap to a bowl and add water. Then start lightly scrubbing the dirty spots with a rag or sponge.
Simple Green: Our cleaning professionals recommend using Simple Green as an excellent cleaning soap for patio paver stones. It does not have any harsh chemicals to discolor or ruin your stones and easily cuts through dirt and stains.
White Vinegar and Water: A more natural way to touch up your paver stones is to use a mixture of water and white vinegar. You have to use white vinegar because dark vinegar could stain. Let the vinegar mixture sit on the pavers for about an hour before using soap and water to scrub away any stains.
Use a Broom: It’s essential to remove dirt regularly from your patio stones. Grab a broom and sweep at least once a week. If you think it might rain, do a quick sweep because leaves can stain your paver stones when they get wet.
Step #2: Removing Weeds
You don’t want weeds to ruin your newly-cleaned pavers. Weeds grow between the seams and are more than eyesores; they can also weaken these seams. Use an anti-weed agent to solve this problem or mix a DIY solution like this one from HGTV. Additionally, powdered herbicides are easy to sprinkle along the seams to combat those nuisance weeds. Lastly, be sure you remove any weeds you see by hand.
Step #3: Sealing Pavers
You spend time cleaning your pavers, so it’s vital to protect your investment even more by sealing them. Sealants protect against Mother Nature and also can help prevent chipping. You should re-seal your patio pavers at least every couple of years. The sealers will also help guard against stains because they add a thin protective coat. After thoroughly cleaning your patio, apply sealers with a paintbrush. Any debris on your deck prevents the sealer from bonding and protecting your pavers.
Step #4: Repair Grout Lines
Keeping a clean patio helps your pavers last longer, but sometimes you need to re-grout, primarily if you use your deck often. To re-grout, use a putty knife to apply a small amount of grout where you need it. Then, make sure you remove any excess grout from the pavers because it could stain. To do this, use a wire brush to remove the dried grout traces. You can also use a grout-specific sealer to protect the seams if your patio has much foot traffic.
Step #5: Replace Pavers
No matter how often you clean, you may need to replace a few pavers once in a while. While this isn’t a must-do “step,” it could be necessary. Overall, it’s easy to replace a new stone without damaging the area. Getting rid of that damaged stone will enhance your patio instantly.
Need Help Pressure Washing?
If you pressure wash your pavers correctly, it will help your property look good as new. However, don’t fret if you don’t want to handle pressure washing on your own—it can be intimidating because you don’t want to ruin your patio and displace the pavers.
Instead, rely on the experts who know how to pressure wash your pavers with care and efficiency. Crystal Cleaning’s soft-touch wash is safe for all types of surfaces, and our highly trained team gets the job done right the first time. Contact us today for a free quote to clean any part of your home’s exterior—or interior—we do it all!